Hacking native ARM64 binaries to run on the iOS Simulator
a 17 minute read (and sources) by Bogo GiertlerNOTE:(bogo) This article focuses on static libraries. I wrote a separate article explaining how to use this technique to get ARM64 dynamic libraries running on the iOS Simulator.
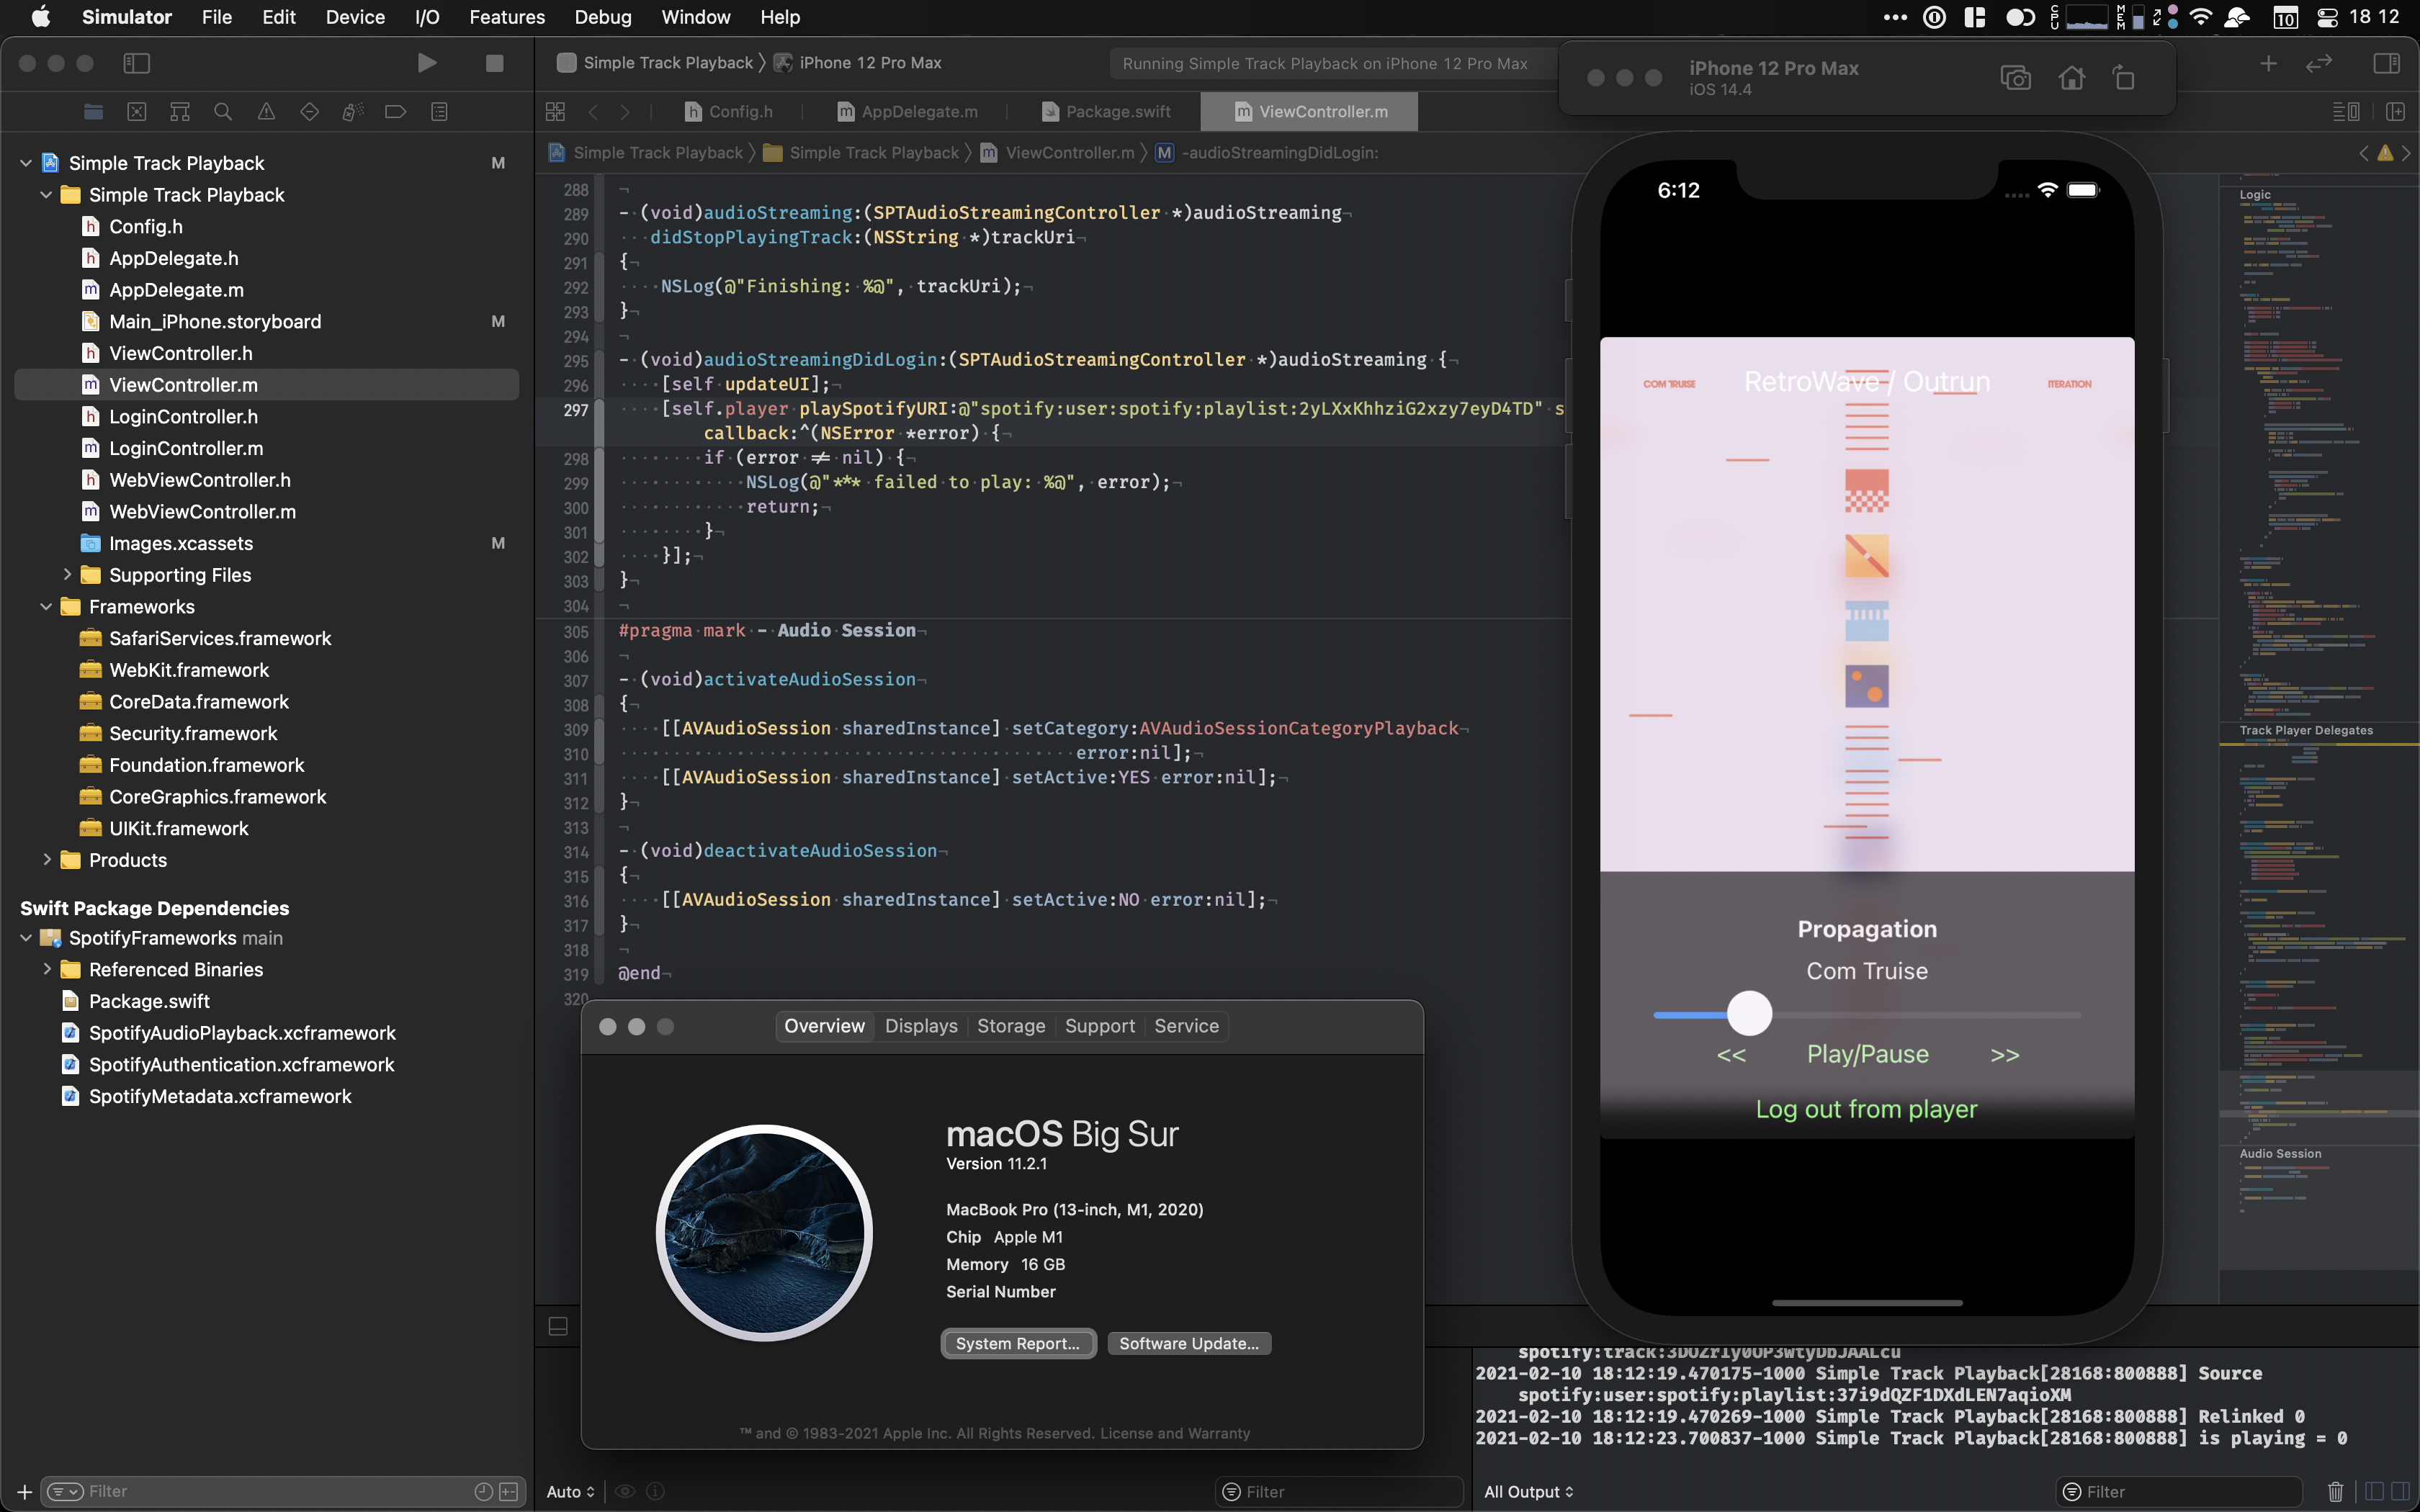
The screenshot above looks perfectly normal - until you realize that the sample app running on this M1 MacBook is actually a legacy Spotify SDK demo from 2017. Its proprietary binary framework has never been rebuilt to support M1 Macs and cannot run on Apple’s newest computers, unless Xcode is launched through Rosetta 2.
If you have an M1 Mac, you probably already encountered this issue. A couple of seconds after hitting Run on your favorite project (and going wow, those M1 Macs sure are fast!), you were likely greeted with this:

ld: in ../../SpotifyiOS.framework/SpotifyiOS(MPMessagePackReader.o), building for iOS Simulator, but linking in object file built for iOS, file '../../SpotifyiOS.framework/SpotifyiOS' for architecture arm64
clang: error: linker command failed with exit code 1 (use -v to see invocation)
In plain English, the proprietary binary framework you’ve been using in your project has not been updated to support iOS Simulator running on M1 Macs. Apple’s advice in this situation is to reach out to the vendor and ask them to release an updated version of the framework - both by migrating it to an XCFramework format, and by rebuilding it to support M1 simulators.
There is a lot of reasons why you might not get your hands on that updated framework anytime soon - or even at all. Commonly, the third-party vendor is slow to react, or you are pinning to a previous major version of the framework for compatibility reasons. Since you likely do not have sources for the original library, you cannot rebuild it yourself either. This means no Simulator builds and no local unit and UI tests. You seemingly hit a dead end and development on an M1 Mac will be very difficult for time being. Or did you?
Last week, I ran into this issue with Spotify’s iOS SDK. With the binary release not updated for over a year, I had to find a way to hack the native ARM64 binary to run in the Simulator. On the way, I learnt a lot about frameworks, binaries, and loaders. You can find the complete sources for arm64-to-sim on GitHub. What follows is a detailed explanation of the ARM64 transmogrification.
💡 An Idea Takes Root
Let’s take a look at the error message again. The error we receive isn’t actually a compiler error - it’s a linker error. ld complains that we are attempting to link in a binary that was compiled for native ARM64 to a binary that is being built for iOS Simulator ARM64.
Historically, the ARM/x86 bifurcation in the Apple product line meant that one could safely assume that code built for i386 and x86_64 was meant for the Simulator, and code built for armv7 and arm64 was meant for native devices. This found reflection in fat (universal) binaries being a widely used hack for distributing frameworks for Apple platforms that could be used both for devices and simulators.
With the release of M1 Macs, this assumption no longer holds true - an ARM64 slice can now be meant for either. Under the guise of supporting macOS, iOS, watchOS, and tvOS in a single framework, in 2019 Apple released a new bundle framework format, XCFramework.
This should give us an idea: since, as indicated by the ld error, we already have a native ARM64 slice in our library, maybe we can repackage it as an iOS Simulator-supporting XCFramework. There is no technical reason why it shouldn’t work - a compiled binary links against symbols of other frameworks and binaries. Since iOS devices and M1 Macs use the same ARM64 instruction set, if the symbols of native and Simulator libraries are sufficiently similar, the library should simply work. We will just need to apply a lot of elbow grease.
🫀 The Anatomy of a (XC)Framework
XCFramework is a pretty straightforward format that is meant to be a drop-in replacement for the original Cocoa Frameworks. Essentially, each XCFramework is a directory containing a property list telling the linker where to find architecture- and plaform-specific copies of each framework.
An example XCFramework looks as follows:
Example.xcframework/
|-- Info.plist
|-- ios-arm64/
|   +-- Example.framework/
+-- ios-arm64_x86_64-simulator/
    +-- Example.framework/
The actual mapping of individual frameworks to platforms is done in the Info.plist file. Notice the SupportedArchitectures, SupportedPlatform, and SupportedPlatformVariant properties.
<?xml version="1.0" encoding="UTF-8"?>
<!DOCTYPE plist PUBLIC "-//Apple//DTD PLIST 1.0//EN" "http://www.apple.com/DTDs/PropertyList-1.0.dtd">
<plist version="1.0">
<dict>
	<key>AvailableLibraries</key>
	<array>
		<dict>
			<key>LibraryIdentifier</key>
			<string>ios-arm64</string>
			<key>LibraryPath</key>
			<string>Example.framework</string>
			<key>SupportedArchitectures</key>
			<array>
				<string>arm64</string>
			</array>
			<key>SupportedPlatform</key>
			<string>ios</string>
		</dict>
		<dict>
			<key>LibraryIdentifier</key>
			<string>ios-arm64_x86_64-simulator</string>
			<key>LibraryPath</key>
			<string>Example.framework</string>
			<key>SupportedArchitectures</key>
			<array>
				<string>arm64</string>
				<string>x86_64</string>
			</array>
			<key>SupportedPlatform</key>
			<string>ios</string>
			<key>SupportedPlatformVariant</key>
			<string>simulator</string>
		</dict>
	</array>
	<key>CFBundlePackageType</key>
	<string>XFWK</string>
	<key>XCFrameworkFormatVersion</key>
	<string>1.0</string>
</dict>
</plist>
After creating a relevant folder structure and dropping in an Info.plist alongside our legacy .framework, we should now have a real .xcframework on our hands. Let’s emplace the original .framework in Xcode with it and try to build. Of course, it would be too easy if it worked - instead, we get the following:

ld: in /Users/bogo/Library/Developer/Xcode/DerivedData/NowPlayingView-aeukgqexpeqlsrdzslkpeehveixs/Build/Products/Debug-iphonesimulator/SpotifyiOS.framework/SpotifyiOS(MPMessagePackReader.o), building for iOS Simulator, but linking in object file built for iOS, file '/Users/bogo/Library/Developer/Xcode/DerivedData/NowPlayingView-aeukgqexpeqlsrdzslkpeehveixs/Build/Products/Debug-iphonesimulator/SpotifyiOS.framework/SpotifyiOS' for architecture arm64
clang: error: linker command failed with exit code 1 (use -v to see invocation)
Since the Cocoa Framework is coming from DerivedData, we can be sure we assembled our XCFramework correctly. Still, we are back to square one - despite our naïve wrapping, the linker can still tell that we are bringing in a native library. Here’s our new objective: to find a way to convince ld that the library is actually a Simulator library.
🕵️ Into the Binary
Let’s take a look inside our framework and see what files could be informing it about the platform.
Example.framework/
|-- Info.plist
|-- Example
|-- Headers/
|   |-- A.h
|   |-- B.h
|   +-- C.h
+-- Modules/
    +-- module.modulemap
Cursory browsing of the human-readable contents of the framework does not yield any hints, so the linker must be using the contents of the binary file itself to infer the Simulator information. Since, we don’t really know what to look for, let’s dig into the binaries of other XCFrameworks out there first.
FirebaseAnalytics.xcframework is a particularly good XCFramework to investigate - it contains both native and Simulator binaries. The obvious first idea is to search for Simulator references in the human-readable strings of the binary:
# in the FirebaseAnalytics.xcframework directory
$ strings ios-arm64_i386_x86_64-simulator/FirebaseAnalytics.framework/FirebaseAnalytics | grep -i sim
The result is a bunch of rather uninteresting strings, none of them mentioning the Simulator. We can make an educated guess that the Simulator information is thus encoded in the machine-readable segment of the binary. To extract it, we can use otool - a tool meant to explore the executable files produced by LLVM. The -fahl parameter prints the relevant fat, archive, and Mach-O headers, as well as the load commands.
# in the FirebaseAnalytics.xcframework directory
$ otool -fahl ios-arm64_i386_x86_64-simulator/FirebaseAnalytics.framework/FirebaseAnalytics
(...)
Load command 2
      cmd LC_LINKER_OPTIMIZATION_HINT
  cmdsize 16
  dataoff 12464
 datasize 760
Load command 3
     cmd LC_SYMTAB
 cmdsize 24
  symoff 13224
   nsyms 201
  stroff 16440
 strsize 5064
(...)
Whoops, that’s a lot of data! The offsets and addresses and sizes are doing us no good and are likely to be different between platforms. Let’s constrain our search to load commands, save the results, and compare them:
# in the FirebaseAnalytics.xcframework directory
$ otool -fahl ios-arm64_i386_x86_64-simulator/FirebaseAnalytics.framework/FirebaseAnalytics | grep -E 'cmd |\.o' > simulator_cmds

$ otool -fahl ios-arm64_armv7/FirebaseAnalytics.framework/FirebaseAnalytics | grep -E 'cmd |\.o' > native_cmds

$ diff -u native_cmds simulator_cmds
-ios-arm64_armv7/FirebaseAnalytics.framework/FirebaseAnalytics(FirebaseAnalytics_vers.o):
+ios-arm64_i386_x86_64-simulator/FirebaseAnalytics.framework/FirebaseAnalytics(FirebaseAnalytics_vers.o):
       cmd LC_SEGMENT_64
-      cmd LC_VERSION_MIN_IPHONEOS
+      cmd LC_BUILD_VERSION
      cmd LC_SYMTAB
(...)
Alright, we got a match! Seems that the Simulator binary contains an LC_BUILD_VERSION load command, while the native binary contains an LC_VERSION_MIN_IPHONEOS load command in the same place. A pass with otool on our unsupported, native-only .framework confirms this theory. A bit of Googling reveals that this specific difference is used by LLDB to distinguish Simulator and native binaries. We are on the right track then - looks like substituting LC_VERSION_MIN_IPHONEOS with LC_BUILD_VERSION might be just enough to fool ld.
📚 Meet the Librarian
So far, we’ve been playing with a fat binary, containing multiple platform-specific slices. We can see architectures available in a binary using the file command:
$ file Example.framework/Example
Example.framework/Example Mach-O universal binary with 4 architectures: [i386:current ar archive] [arm_v7] [x86_64] [arm64]
Example.framework/Example (for architecture i386):        current ar archive
Example.framework/Example (for architecture armv7):       current ar archive
Example.framework/Example (for architecture x86_64):      current ar archive
Example.framework/Example (for architecture arm64):       current ar archive
Obviously, for our purposes we don’t particularly care about x86 or ARMv7 slices. So let’s grab just the arm64 one:
$ lipo -thin arm64 Example.framework/Example -output Example.arm64
If we open the resulting Example.arm64 file in a hex editor (such as Hex Fiend), we should notice that the magic number (file format identification pattern) of the file spells !<arch> in ASCII - this means, we are not working with an individual binary, but a UNIX archive of binaries - a library. We can unpack it quite easily:
$ ar x Example.arm64
The result should be a number of familiar looking .o files. If we open any of them in a hex editor, we should see the CFFA EDFE as the initial 2 bytes - a little-endian encoded FEED FACE + 1, the magic number of ARM64 Mach-O binaries. (with the original FEED FACE being the magic number of ARM32)
At this point, we have gone from an XCFramework, to a Cocoa Framework, to a UNIX library, to individual Mach-O binary objects that we can finally edit - truly, a matryoshka of abstraction layers spanning nearly 40 years of computing history.
✂️ Dissecting a Mach-O Binary
While trying to read and edit the object file in a hex editor is possible, it will quickly prove to be a fool’s errand. A look at the publicly available XNU sources for the Mach-O loader shows that LC_VERSION_MIN_IPHONE and LC_BUILD_VERSION are different in size. LC_BUILD_VERSION struct has 2 extra fields of UInt32 size, meaning it is exactly 8 bytes longer than than LC_VERSION_MIN_IPHONE.
While the machine code segment generated by LLVM is position independent, the headers and load commands are not - after all they are navigation instructions for the loader. To place a longer load command in the binary, we need to both re-create the binary and adjust all the references to the absolute distance from the beginning of the binary file. (typically referred to as offsets)
To do this, we need to first understand what makes up a Mach-O binary. According to the official Mach-O ABI docs and the loader.h specs, a Mach-O binary can be separated into 4 basic components:
- a Mach-O header, which contains the magic number (such as
CAFE BABEorFEED FACE), supported CPU type, and a number and size of load commands; - a load command table, which is arbitrarily long and informs the linker about the binary and where to find segments of interest in the raw content;
- an optional padding, which can be added by a developer to simplify subsequent edits to the binary;
- a raw content, which contains the executable code, strings, and everything else required for the actual execution - all at offsets described in the load command table.
All these components are described as byte-aligned C structs in the MachO framework. Armed with this knowledge, we can start implementing a simple command line tool to read and transmogrify any Mach-O binary from a native one to a Simulator one.
import Foundation
import MachO

extension Data {
    func asStruct<T>(fromByteOffset offset: Int = 0) -> T {
        return withUnsafeBytes { $0.load(fromByteOffset: offset, as: T.self) }
    }
}

let path = CommandLine.arguments[1]
guard let handle = FileHandle(forReadingAtPath: path) else {
    fatalError()
}

let headerData = try! handle.read(upToCount: MemoryLayout<mach_header_64>.stride)!
let header: mach_header_64 = headerData.asStruct()
if header.magic != MH_MAGIC_64 || header.cputype != CPU_TYPE_ARM64 {
    fatalError()
}
If we fed the transmogrifier a valid Mach-O binary, the header struct will now inform us of the number of load commands and their total size. To read individual load commands following the Mach-O header, we need to understand two things: that C structs representing Mach-O commands are not explicitly polymorphic - they implicitly follow the load_command - and that individual load commands are not fixed in size.
In other words, every load command begins with a load_command struct. This struct contains exactly two 32-bit integers - describing the command type and the command size. To read the commands correctly, we need to support peeking into our FileHandle and checking the command size and type straight from raw Data objects:
extension Data {
    var loadCommand: UInt32 {
        let lc: load_command = withUnsafeBytes { $0.load(as: load_command.self) }
        return lc.cmd
    }

    var commandSize: UInt32 {
        let lc: load_command = withUnsafeBytes { $0.load(as: load_command.self) }
        return lc.cmdsize
    }
}

extension FileHandle {
    func peek(upToCount count: Int) throws -> Data? {
        let originalOffset = offsetInFile
        let data = try read(upToCount: count)
        try seek(toOffset: originalOffset)
        return data
    }
}
Armed with these functions, we can now start extracting individual commands into Data blobs:
let loadCommandsData: [Data] = (0..<header.ncmds).map { _ in
    let loadCommandPeekData = try! handle.peek(upToCount: MemoryLayout<load_command>.stride)
    return try! handle.read(upToCount: Int(loadCommandPeekData!.commandSize))!
}
The most difficult individual load command to work with is LC_SEGMENT_64. Similarly to the Mach-O header, LC_SEGMENT_64 is actually composed out of a segment_command_64 struct, followed by an arbitrary number of section_64s:
var segment: segment_command_64 = data.asStruct()

let sections: [section_64] = (0..<Int(segment.nsects)).map { index in
    let sectionOffset = MemoryLayout<segment_command_64>.stride + index * MemoryLayout<section_64>.stride
    return data.asStruct(fromByteOffset: sectionOffset)
}
With all the commands in memory, we can now finish reading the binary by saving the remainder of it for later handling:
let programData = try! handle.readToEnd()!
try! handle.close()
Lastly, we need to persist the entire thing back to disk. And since we are dealing with a lot of Data arrays, let’s simplify their handling too:
extension Array where Element == Data {
    var flattened: Data { reduce(into: Data()) { $0.append($1) } }
}

try! [
    Data(bytes: &header, count: MemoryLayout<mach_header_64>.stride),
    loadCommandsData.flattened
    programData,
].flattened.write(to: URL(fileURLWithPath: "\(path).reworked.o"))
The resulting file should be exactly the same as the input file. We can confirm this using cmp:
$ cmp -s input.o input.o.reworked.o || echo "Files are different!
If we see no errors, the reassembly worked as expected. We can now safely edit binary’s load commands.
🚀 Raison d’Être
At this point, we broke up the binary with surgical precision and are ready to edit its individual components. The largest change is, of course, getting rid of the LC_VERSION_MIN_IPHONEOS command and replacing it with an instance of LC_BUILD_VERSION. Once this is done, we need to reconstruct the offsets in the following load commands:
LC_SEGMENT_64- where we need to updateoffsetandreloffproperties of individual sections, as well as thefileoff,filesize, andvmsizeproperties for the entire binary;LC_DATA_IN_CODEandLC_LINKER_OPTIMIZATION_HINT- which are represented using the same C struct, both requiring an update to thedataoffproperty;LC_SYMTAB- where we need to change thestroffandsymoffproperties, for, respectively, strings and symbol tables offets;
The most straightforward way to perform all the updates to the load commands, is to simply use Swift’s map and handle the updates in helper functions:
let offset = UInt32(abs(MemoryLayout<build_version_command>.stride - MemoryLayout<version_min_command>.stride))
let editedCommandsData = loadCommandsData
    .map { (lc) -> Data in
        switch lc.loadCommand {
        case LC_SEGMENT_64:
            return updateSegment64(lc, offset)
        case LC_VERSION_MIN_IPHONEOS:
            return updateVersionMin(lc, offset)
        case LC_DATA_IN_CODE, LC_LINKER_OPTIMIZATION_HINT:
            return updateDataInCode(lc, offset)
        case LC_SYMTAB:
            return updateSymTab(lc, offset)
        case LC_BUILD_VERSION:
            fatalError()
        default:
            return lc
        }
    }
    .merge()
For handling LC_VERSION_MIN_IPHONE_OS, we need to return a Data blob containing a new instance of the build_version_command struct in our helper function. For other load commands, we simply update the C structs and return them as Data objects. The individual implementations of all the load_command changes are available in the GitHub repository for the project.
Last, but not least, we need to update the sizeofcmds property in the Mach-O header before the binary is written back to disk:
header.sizeofcmds = UInt32(editedCommandsData.count)
At this point, running our transmogrifier should yield a valid ARM64 Simulator file. Of course, updating a single binary only gets us so far - we still need to perform a couple more tasks:
- use the transmogrifier on every object file;
- archive the objects back into a library;
- merge the library with the original x86_64 slice to form a Simulator-friendly fat binary;
- substituting the original library file within the Cocoa Framework within the XCFramework.
We can knock off the first two pretty easily:
$ for file in *.o; do arm64-to-sim $file; done;
$ ar crv ../Example.arm64-reworked *.reworked.o
As a part of assembling the library, ar attempts to construct an index from provided binaries. The process requires performing extensive checks to confirm each object is a valid executable, and, thankfully, yields detailed errors. If we made any mistakes or omissions in our offset reconstructions, ar will tell us which section is faulty and what is it overlapping with. From here, we just need to keep hammering on the edits in our code. Once ar is happy, we can merge our transmogrified ARM64 slice with the Intel one.
$ lipo -create -output Example Example.x86_64 Example.arm64-reworked
Finally! We now have a fat binary containing ARM64 and x86-64 Simulator slices. After substituting the original library file in the framework with our hacked one, it’s time for a ⌘+R and a moment of truth…
Boom! A native ARM64 framework hacked to run as a Simulator framework on M1 Macs! 🎉
🤓 Learnings and Dead Ends
It took me a total of 15 hours to come up with this solution. Along the way I understood:
- how Cocoa frameworks, UNIX libraries, and Mach-O binaries are constructed;
- that ARM64 code is more universal than I thought and Apple is remarkably consistent about it across platforms;
- that binary files are just more advanced finite automatons.
This wouldn’t be an exciting project without a few dead ends. My futile attempts included:
- using the open source security research tools, but neither LIEF nor ruby-macho can reliably edit offsets required to insert an additional command into the Mach-O header - instead they require binaries to be built with extra padding;
- freeing up the “missing” 8 bytes by removing the 80 byte long
__cmdlinesection fromLC_SEGMENT_64– I was initially afraid to edit the binary offsets of load commands, but this still causedarto complain about offsets; - getting more “space” in the binary by stripping Bitcode (
xcrun bitcode_strip $input -m -o $output) - the resulting binaries did not contain any additional padding.
👍 Future Improvements
A couple of potential improvements to the tool are left as an exercise to the reader. These could be:
- making the offset handling more dynamic by doing two passes on the load commands and passing a data/offset pair (
DOP) around instead; - persist the minimum iOS and SDK values from the original
version_min_commandin the newbuild_version_command; - extending binary hacking to support other Apple platforms (tvOS, watchOS, etc) natively and in Simulator;
- turning the legacy frameworks into bona fide Clang modules by exposing their umbrella headers through
module.modulemap; (to avoid Swift bridging header headaches)
🙌 References and Contributions
A couple of people and projects deserve special thanks for making this effort easier:
- Zac West - thank you for pointing me in the direction of loader commands and
LC_BUILD_VERSIONin particular; - Hex Fiend and Mach-O Browser - two solid tools for, respectively, exploring and comparing raw binaries, and for investigating the load commands of Mach-O binaries;
- LIEF and macho-ruby - two great open source libraries for platform-independent reading of Mach-O binaries (writing was a bit
¯\_(ツ)_/¯); - marzipanify - Steven Troughton-Smith attempted to solve a similar problem in 2018, albeit in the other direction;
- Macho-O Internals presentation - William Woodruff prepared an excellent explanation of how the Mach-O binaries are organized.